How to Create a Blog in WordPress in 2025 [Guide]
Have you ever been overwhelmed with the idea of starting your own blog and getting paid to do it? If so, you’ve just come to the right place. In this guide, we’ll show you exactly how to create a blog in WordPress, step-by-step. Don’t waste any more time and read this guide now to start your blogging journey today.

Blogging and writing niche sites is not as complicated as you may have heard. In fact, it depends on which platform you’re using to do it. For me personally, I always use WordPress.
A lot of bloggers choose WordPress instead of other platforms. The main reason is that you don’t need to be a developer to create a website on WordPress. This platform has more than 64 million domains as of 2021.
But, What Is Blogging?
A blog is a type of website that publishes articles, diary-like entries, or the like for the general public. People use them to post information about themselves, and if they have an audience capable of creating content, by other users, this will help them leverage their impressions, influence, and interest in the material, after which they can convert it into cash.
The Advantages of Blogging
Writing blogs as a career is where I wanted to be. You know that feeling when you get paid for blogging and can work whenever you want and you are not confined to a desk? Totally for me!
The Disadvantages of Blogging
In order to be successful in blogging, one needs to post consistently which could be a challenge if you work full-time and you’re a beginner.
How Do I Create a Blog on WordPress?

Now that you have all the basics, let’s learn how to start a blog properly.
What Do I Need to Set Up A Blog?
- You know what you need to start writing a blog? You need time, energy and an awesome You know what you need to start writing a blog? You need time, energy, and an awesome topic. Or maybe you need passion, something that inspires your words or simply some creative juices flowing.
- A Personal Computer (PC): It would be a real pain for you, as a beginner, to set up your new site using a mobile device.
- Some Money to Invest in Your Business: Yes, I consider this an investment because you will get it back. Your Budget:
WordPress – Free – No Hidden Costs)
Hosting – Paid ($2.99/month at Hostinger)
Theme – Free or Premium( Your Choice)
Thats’ all you need!
“Too good to be true?” Let me show you how (step-by-step) and with screenshots.
There are four basic steps you need to take in order to set up on a WordPress website or blog.
Choose Your Blog Name and Hosting
Choose a Hosting Service Provider for Your Site
Install WordPress
Login to WordPress and Beautify Your Site
Choose Your Blog Name and Hosting
Take some time to properly choose the name for your brand so you can connect with your audience. You may even consider combining the words in the domain like weight + loss. If you are just starting out with your business, I would avoid investing in premium domains. It’s for your own good and it’s not necessary. Just stick to domains that end in –.com rather than a different extension and you should be good. If you are to take any other extensions, please make sure that you do proper research first.
Once you are happy with the domain you chose, go to Hostinger and click on the domains tab to see if your domain name is still available. Just type in your ideal domain name and click on the search button.
If you decide to buy your domain with websites such as GoDaddy, you will have to follow extra steps later to connect it to your Bluehost account. So you are better off if you buy your domain name through BlueHost.
Choose a Hosting Service Provider for Your Site
The next step is to choose a spot to host your site. Hosting is a place to park your domain on the internet. It’s like renting space.
Hostinger is my hosting provider of choice because of how painless its WordPress installation is. You can simply sign up for a Hostinger account and a free one-click WordPress installation is included.
More Reasons Why You Should Get Your Hosting Plan at Hostinger:
It is Simply the Best
Hostinger began its journey in 2004 in Lithuania under the name Hosting Media. In 2007, it introduced 000webhost, offering free web hosting services, followed by the launch of Hosting24 in 2008.
Trusted by Millions
Over the years, the company experienced rapid growth and, by 2020, became one of the fastest-growing web hosting providers globally. Today, Hostinger serves over 3 million users worldwide and employs more than 900 people across various countries.
One-Click WordPress Installation
Hostinger is a reputable WordPress hosting provider and the two combined are the perfect way to start a blog as a newbie.
Hostinger will automatically link your domain name to your hosting service so that you don’t have to go through the confusing and time-consuming process of talking to multiple companies to have your domain name and hosting linked together.
Three Packages to Choose From
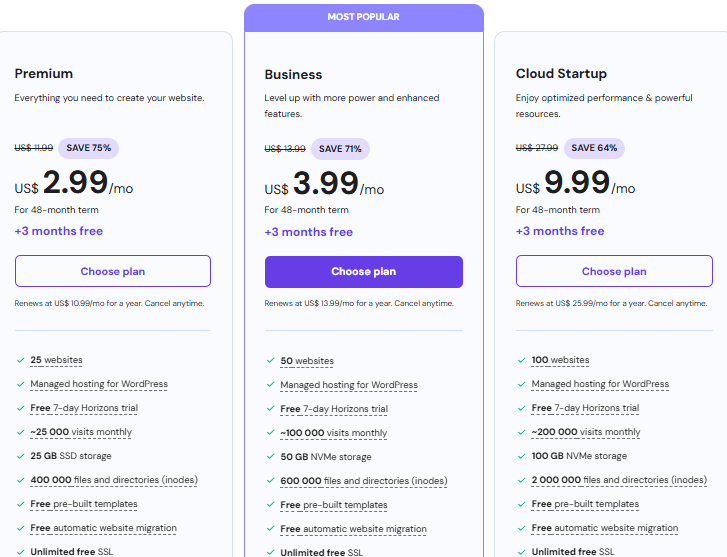
Hostinger offers three core shared hosting plans that are perfect for creators who are just starting out or growing steadily. Here’s what each plan offers, and which type of creator it’s best suited for:
1. Single Web Hosting
Best for: New bloggers, minimalist creators, or one-brand solopreneurs
- 1 website only
- 50 GB SSD storage
- ~10,000 monthly visits supported
- Free SSL (for a secure “https” site)
- 1 email account
- Managed WordPress + auto installer
- No free domain
- Weekly backups only
Why choose this plan?
If you’re launching your very first blog or brand site, this is a no-fuss option. It’s affordable, streamlined, and gives you everything you need to start building your online presence with Pinterest traffic and long-form blog posts.
Great if:
- You’re starting CreateAndLeave-style blogs
- You want a distraction-free setup
- You only need one brand or website
2. Premium Web Hosting (Most Popular)
Best for: Multi-brand creators, bloggers with side projects, or growing solopreneurs
- Host up to 100 websites
- 100 GB SSD storage
- ~25,000 monthly visits supported
- Free domain for 1st year
- Free email accounts
- Free SSL
- Weekly backups
- WordPress acceleration
Why choose this plan?
If you plan to run more than one blog, or you’re expanding into new niches, this plan offers flexibility. It’s ideal for creators who want to build out additional sites—like a quotes blog and a personal brand and a niche business site.
Great if:
- You want multiple blogs (e.g. quotes + branding + affiliate site)
- You plan to manage client sites
- You’re focused on SEO + Pinterest across niches
3. Business Web Hosting
Best for: Full-time content creators, coaches, or shop owners needing performance
- Host 100 websites
- 200 GB SSD storage
- ~100,000 monthly visits supported
- Daily backups
- Free domain & SSL
- Enhanced speed & security
- Object caching for faster performance
- Priority customer support
Why choose this plan?
This is for creators who are serious about speed, uptime, and scaling. If you’re monetizing through ads (like AdSense or Ezoic), affiliate marketing, or running an online shop, this plan gives you the reliability and performance you need.
Great if:
- You expect high traffic
- You run ad-heavy sites
- You want peace of mind with daily backups
Which Plan Do I Recommend for Creators Starting with Pinterest?
Go for: Premium Web Hosting
It’s the best value for creators who plan to grow. You can run multiple brands under one hosting account, get a free domain, and use WordPress + Pinterest to grow without worrying about switching plans later.
Unlimited Bandwidth
What Does Hostinger’s Unlimited Bandwidth Really Mean for You as a Creator?
When browsing hosting plans, the term “unlimited bandwidth” can sound vague—but it’s actually a huge advantage for creators, bloggers, and entrepreneurs who are planning for growth.
First, what is “bandwidth”?
Bandwidth refers to how much data your site can transfer to visitors. Every time someone loads a page, views a photo, or reads your blog, they’re using a small amount of bandwidth. If you have limited bandwidth, your site can slow down or even go offline during traffic spikes.
Hostinger’s Unlimited Bandwidth: Why It Matters
All of Hostinger’s Premium and Business Web Hosting plans include unlimited bandwidth, meaning:
- No cap on monthly traffic – Bring on the Pinterest clicks! You won’t be penalized for growing your audience.
- Smooth performance – Even if hundreds of people visit your blog at the same time, your site won’t crash.
- Room to grow – Whether you’re launching your first blog or expanding into multiple brands, your hosting can handle it.
Why Creators Should Care
If you’re relying on Pinterest, SEO, or even email newsletters to drive traffic to your site (like on Create and Leave), unlimited bandwidth gives you the freedom to grow without fear.
Let’s say a pin goes viral and suddenly 20,000 people visit your post in a week—your site stays online, fast, and functional.
Bonus: No Hidden Charges
Unlike some hosting providers that throttle your site when you use “too much” (even when they say it’s unlimited), Hostinger is transparent. As long as you’re not abusing server resources (like running illegal content or spam scripts), you’re good.
Install WordPress
Like I said before, Hostinger’s “one-click” installer will set up WordPress for you, so head on to Hostinger and sign up for your hosting plan.
It’s all taken care of in your Hostinger registration.
Once you are Hostinger.com and hit ‘Choose Plan‘. It is simply easy!
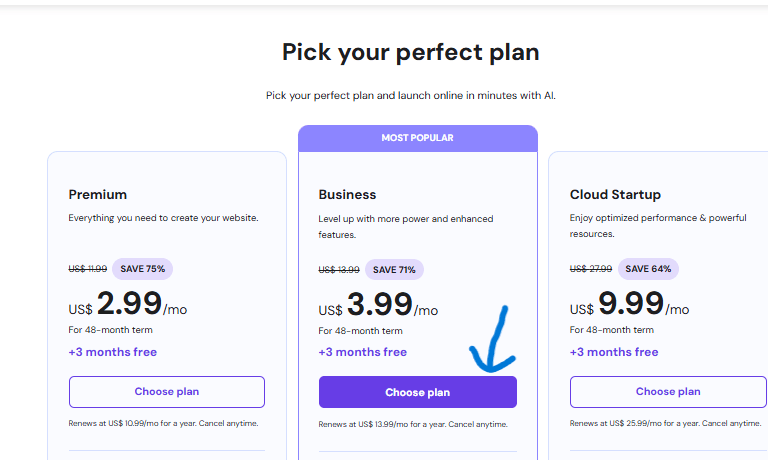
Once you click ‘Choose Plan‘ as indicated in the screenshot above, you will be prompted to buy your hosting plan. Choose the one that suits you best.
After payment, you will be prompted to create a password for your new account then click “Create Account”.
Now it is time to log into your new account.
Once you’re logged in to your Account, click on “Add website”.
My example Name: Create and Leave
Tagline: Inspiration for Women Who Want More (because my goal is to help women live extra-ordinarily). Overall, your tagline should describe what you do (be creative).
So click “Create Site”
and, Give Your Site a Name and a Tagline
From the dropdown menu, choose the domain you want to install WordPress on (though in your case you only have 1 domain...).
Click Next and you will then receive an installation complete page and the login URL for your site as well as a password through email.
NB: Take note of this as it will be the domain you will go to log in.
Login to WordPress and Beautify Your Site
There are two ways to access your WordPress if You are using Hostinger.
Log Into Your WordPress Dashboard
To do this, log in to http://www.yourdomainname.com/wp-admin to bring up the login screen like this(Replace “yourdomainname.com” with your domain name).
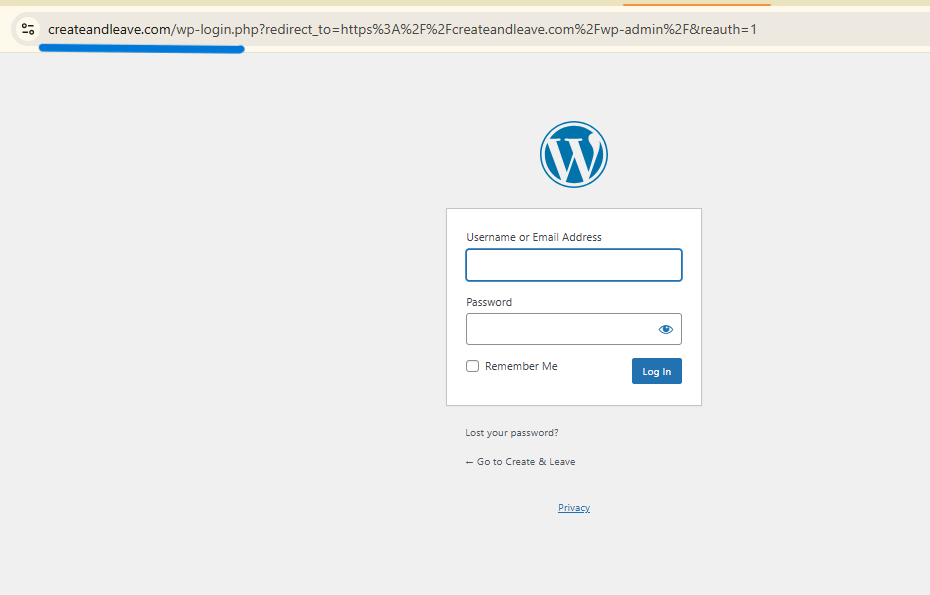
Go on and use the password and email address that you signed up for your hosting account with.
OR
Log Into WordPress Via Hostinger
Another way to access your WordPress dashboard is through Hostinger.
Follow the instructions below:
Go to Hostinger. Click at Login in order to Login by Email.

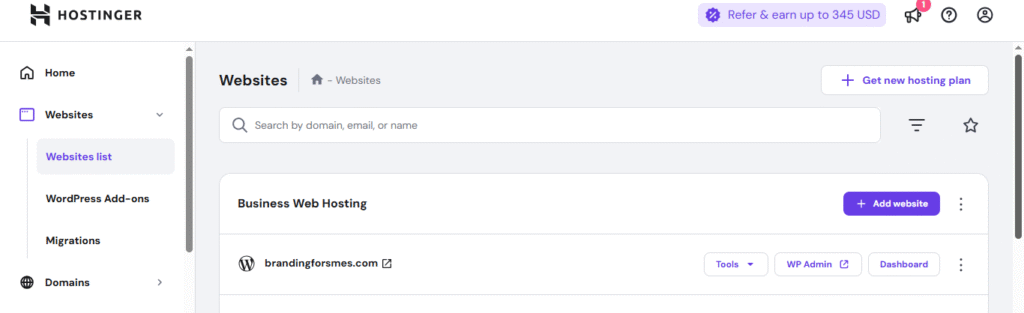
You will be taken to a page like this, your Hostinger dashboard. Click at Websites.
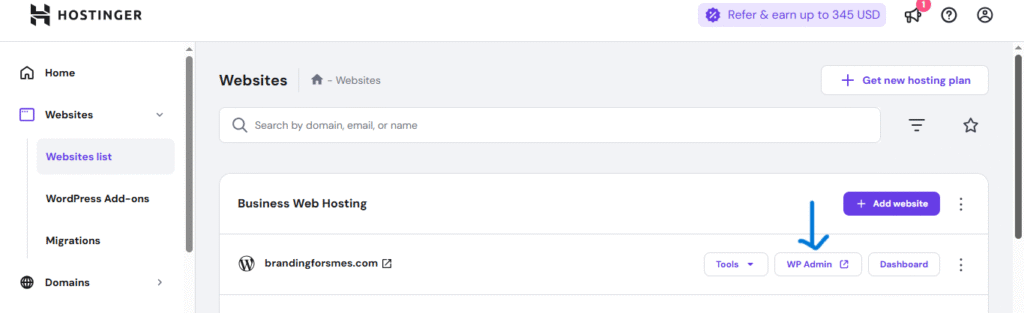
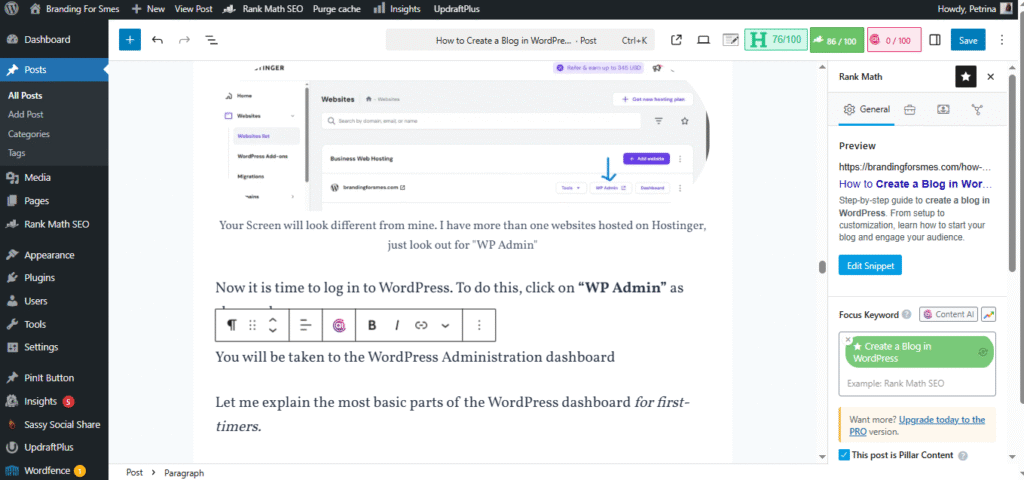
Now it is time to log in to WordPress. To do this, click on “WP Admin” as shown above.
You will be taken to the WordPress Administration dashboard
Let me explain the most basic parts of the WordPress dashboard for first-timers.
Posts
Posts are your blog entries in form of text. They are the backbone of your blogging business because it is through posts (articles) that you will be able to offer value to your readers.
These entries will display in reverse order on your blog page.
To access your posts (after posting off course), click on “All posts” it will show you all the posts you have on your blog, both published and unpublished (drafts).
To add a new post, click on “Add Post”. You will be taken to the WordPress editor.
Here you can enter the blog post title and body text (more on this later).
Pages
Pages are the static one-off type of documents in WordPress. They are a perfect choice for pages such as the about page (information about you, the author), privacy policy, and contact page since they do not have a publish date. They are primarily meant for static and timeless content.
To add a new page to your WordPress blog, find the Pages menu in the WordPress Dashboard Navigation menu.
Click Add Page.
Media
The media tab is located on your WordPress admin sidebar.
This powerful feature enables you to store and manage your images and other media such as videos and pdf documents.
It includes all the media details such as alt text for pictures, the title, caption, description, URL, and metadata of the media file like size, type, and upload date.
NB: It is not compulsory to fill in the information Alternative Text, Title, and Description, but this information plays a role in ranking your media on search engines.
For example: if I left the image with the current Filename: cropped-Create-to-startFav-1.png, it will not make any sense to the search engines.
How to add images to WordPress media library
On your WordPress Dashboard menu, click Posts, and then click Add Post to display the “Add Post” page. Enter the blog title and all post content.
If you need to add a picture, hover wherever you want to add and a cross will appear.

Click on the Plus to add block you you will see this:
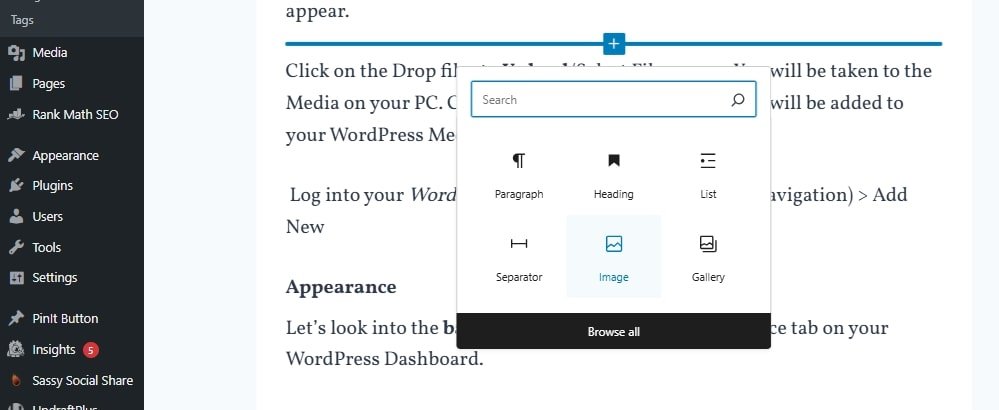
Click on the image icon to Upload/Select Files menu. You will be taken to the Media on your PC. Choose the appropriate media, add it will be added to your WordPress Media library.
NB: If you just want to add iamges without linking to any post for later use, log into your WordPress website · Click on Media (left navigation) > Add Media File.
Appearance
Let’s look into the basic subsections under the appearance tab on your WordPress Dashboard.
- Themes
- Customize
- Widgets
- Menus
Themes
You need to change the theme. Click at Themes.
Click on the plus sign to add a new theme.
Next, search for a free theme called Kadence (I think it is the best Free Theme)
You can either choose Preview to see a demo of the theme or install it by clicking the Install button once you’re ready.
Customize
The Customizer feature allows you to change the appearance and functionality of your website in real-time. For example, you can the Colors and select a background image.
Widgets
Widgets are small blocks of specific functionality that you can place on your WordPress sidebars to display snippets of content.
You are likely to find default widgets on your sidebars. To remove it, click on that specific widget
Then, Delete
You may add About me Widget for now. Locate it under the available widget, drag it to the sider bar.
Click on the widget to open up and fill in your details. It should appear on top of the sidebar.
Menu
WordPress already has a navigation menu that you can use. But if you want to create a custom menu,
- Go to Dashboard > Appearance.
- Click “Menus”
- Name Your Menu.
- Click “Create Menu”
Plugins
It is very important to add some plugins to your blog. This will make your blogging life as convenient as possible.
To add a plugin:
Go to “Plugins” in your WordPress dashboard.
Click on Plugins > Add Plugin.
Browse to the plugin archive and select it.
Then click Install Now and the plugin will be installed shortly.
Below are Plugins That I recommend:
Rank Math/Yoast SEO: For better Search Engine Optimization (SEO) and to have more control over how your posts look in browsers such as Google search results. More on this later.
WPForms: You can use this plugin to set up a contact form
Akismet Anti Spam: For protection against spam
WP Super Cache/Light Speed: To will speed up your blog
Sassy Social Share: For social sharing buttons
WP Smush: This plugin reduces image file sizes and improves performance
Disqus commenting system: This is good for comments
Updraft Plus to back up your content
In addition to the plugin above, you must also add Google Analytics and Google search console to your blog
It is important to set up your Google Analytics and Google Search Console at the very beginning. This is important for tracking what the people who visit your blog site are doing and optimize accordingly.
Settings
The Settings area is where you can view, edit basic site information of your site.
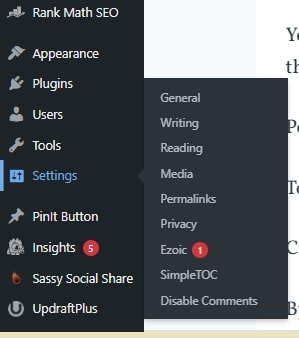
You really don’t need to edit any of these functions right now, except one thing = Permalinks.
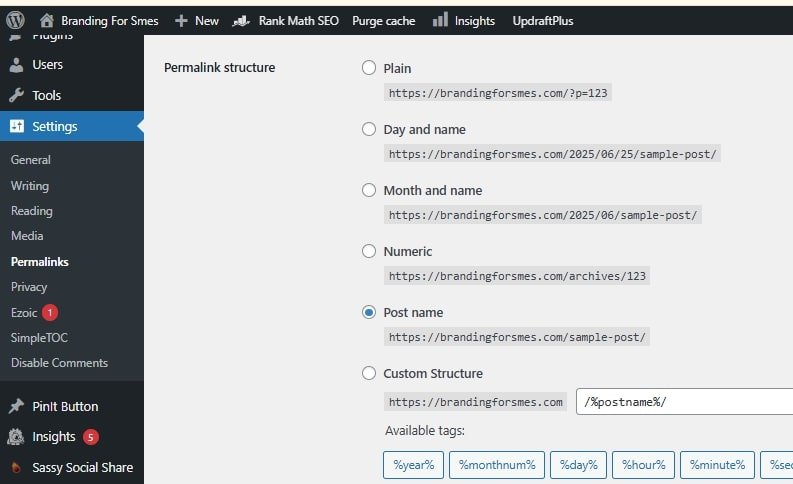
Permalinks refer to the format for the URL of your posts.
To change it, follow the instructions below:
Click at settings > Permalinks
By default, Plain under Common settings will be selected. Change this to Post name.
Give Your Site Identity
Click on the little house at the top of your WordPress dashboard to see how your site looks.
You may not be happy with what you see.
Lets’ give your site a unique design, so it can stand out. We can achieve this by uploading a logo, a site title, tagline, icon, and images.
How to Add Logo in WordPress Header
You can easily create a logo using canva.com(that’s what I used).

You can add a png logo to your header:
- Log in to your WordPress Administration dashboard.
- Select “Customize”(which is next to themes) from the drop-down menu under “Appearance”.
- You should then be able to upload the logo of your choice by selecting the menu option for “Header” or “Logo” settings.
- Depending on your theme, click on Add Logo or click “Select Image”.
- After your done be sure to click on Save & Publish.
How to Add Site Title and tagline in WordPress
- Go to your WordPress Administration dashboard.
- Navigate to Appearance on your left sidebar and click on Customize.
3. Depending on your theme, click on General Settings.
4. Then, Site Identity or Site Title and Tagline in the Customizer (Depends on the theme).
5. Once in the site Identity options, you can change the title, tagline and upload your site icon.
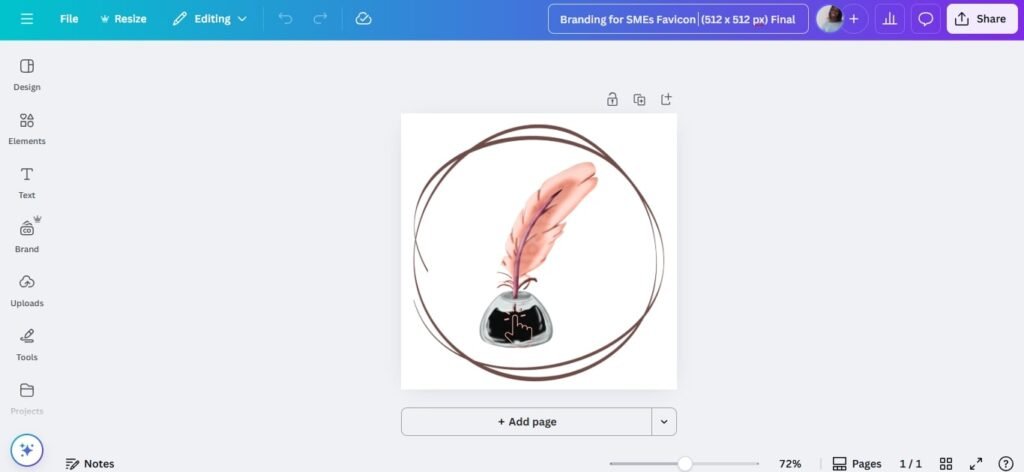
Use Canva (free tool) to design your site icon.
Side Note: Our icon features a feminine fountain pen nib with a soft digital twist—blending elegance with modern creativity. It symbolizes thoughtful expression and the quiet power of building a brand with grace and strategy. For introverted women creators, it’s a reminder that your calm presence can still make a bold impact. Let it guide you as you design a logo that feels both strong and beautifully feminine.
So, don’t just choose any random icon.
6. Once finished, click Publish to save your changes.
Write and Share Your First Blog Post
You have successfully set up your blogging business. Now it is time to write valuable content, and share your experience with the world.
Once your first blog post is ready, follow the steps below to share your post with the world:
Step 1: Log in to the WordPress dashboard
Step 2: Navigate to Posts on your left sidebar and click on Add Post.
Step 3: Enter the title of your new post
Step 4: Enter body content
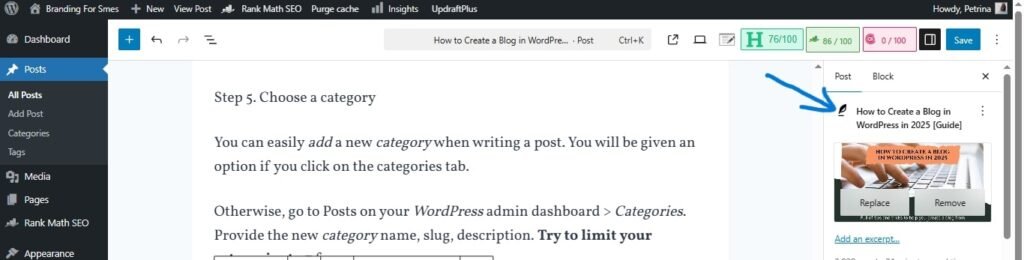
Step 5. Choose a category
You can easily add a new category when writing a post. You will be given an option if you click on the categories tab.
Otherwise, go to Posts on your WordPress admin dashboard > Categories. Provide the new category name, slug, description. Try to limit your categories to 7 for now.
Step 6. Upload Featured Image
The Featured Image is the main visual that represents your blog post across your site, on Pinterest, and in search results. It’s like your post’s cover photo—designed to grab attention and reflect your content. Choose a vertical, eye-catching design that includes your post title or a quote. Upload it before publishing so your post stands out beautifully everywhere it’s shared.
Frequently Asked Questions
How Long Should Blog Posts Be?
Technically, there is no official minimum for blog post length. However, I recommend that your blog post should contain at least 600 words in order to rank well in the search engines. That said, long posts (1000 words or more) will rank more easily than short posts.
How Can I Promote My Blog?
You can’t just create valuable, high-quality content for your blog and assume readers will find their way to your site to consume it. You must use blog promotion to promote your content so you can drive traffic.
One of the most powerful strategies to drive traffic to your blog is to post on social networks such as Pinterest, Facebook, Instagram. However, Pinterest is good for longevity as it acts more like a search engine than a social media platform. You can easily optimize your blog post for Pinterest and get found in the search results. Google also loves Pinterest. Thus, ranking on Pinterest gives you an opportunity to be found on Google results.
Once you start getting organic traffic, you will start making money from your blog, without spending a dime. The average time it takes for a new blog to get traction in the search engines is around 3 to 6 months. However, it depends on what keywords you’re targeting with your blog posts (low-competition keywords rank easier than high-competition keywords).
How Much Do WordPress Bloggers Make?
It depends on the niche and effort the blogger puts into their blog business. There are bloggers who are making as much as $2000 per month. But there are also bloggers who are making less than $100 per month. So there are a lot of factors involved.
That said, you too can make money blogging even as a beginner. Once you’ve got your blog up and running, you can finally start looking into ways to make a profit from it.
How Do Beginner Bloggers Make Money?
One of the most common ways beginner bloggers make money is through placing affiliate links on their site. These links take the audience to the website of the product or service owner. Upon purchase of the specific product or sometimes even other products, you get a commission. This is referred to as Affiliate marketing.
Consider Top Affiliate Network/ Market Places like
JVZOO – This does not require approval and you can get high commissions (Internet Marketing Niches only)
Amazon – Has earned the trust of many shoppers worldwide.
ClickBank – Offers high commissions to affiliates and has earned trust.
How to Get Paid from Affiliate Marketing
There are different ways to get paid in affiliate marketing. But regardless of which affiliate network you use, there is a high probability that they will pay their affiliates through PayPal and Bank Wire transfer.
Creating a PayPal account is free and there are no maintenance costs. However, there is a possibility that your country is not on the list of countries that are supported by Paypal (receive Money).
In that case, you are left with no other choice but to use Bank Wire transfer(direct withdrawal) into your own bank account. This method can be very expensive as Bank transfer fees can be up to 5% in hidden fees, especially if your currency is different from the Merchant.
However, there is a solution to this issue:
You can use TransferWise. Transfer Wise (or now Wise) is perhaps the best online bank/transfer service I have ever come across to. It is touted to be 8x cheaper than banks.
That is it from me! Happy Blogging